
사용자에게 미리 알림을 주고 다른 사람과의 소통을 가능하게 하며
앱에서 보내는 기타 정보를 적시에 제공하기 위해 Android가 앱의 UI 외부에 표시하는 메시지
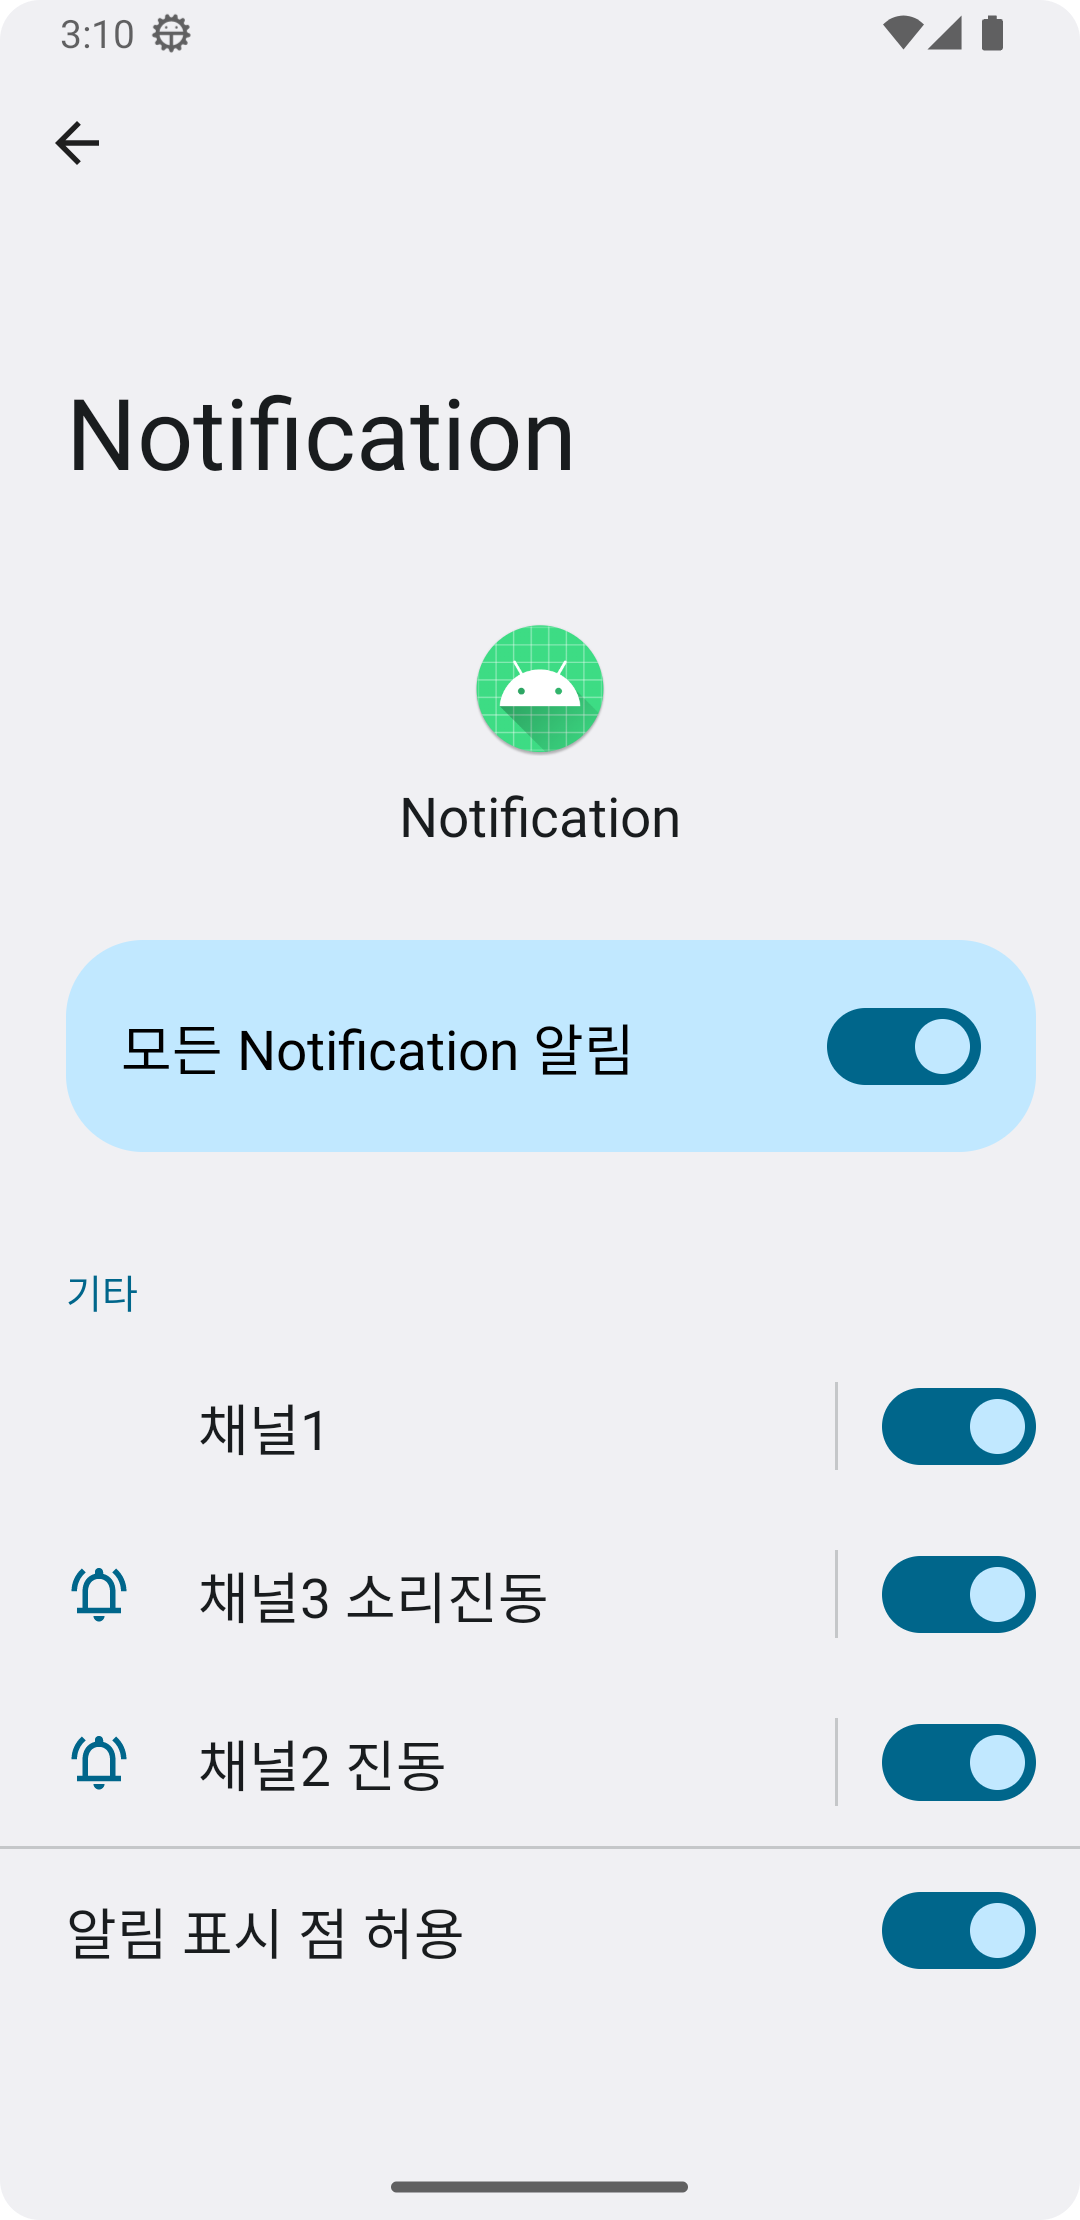
Notification의 구성
전체적으로는 Notification 객체에 각종 정보를 담고 이 객체를 NotificationManager로 시스템에 등록하는 구조
SDK 33 이상부터는 Notification에 대한 권한 지정과 요청이 필요하다. (33 이상에서만 해당 권한 추가 가능)
<manifest ...>
    <uses-permission android:name="android.permission.POST_NOTIFICATIONS"/>

    ...
</manifest>
Manager
NotificationManager : 알림을 시스템에 발생시키는 SystemService
getSystemService() 함수를 이용하여 NotificationManager를 얻어서 사용하거나 NotificationManagerCompat을 이용해 바로 이용해도 좋다
// NotificationManager 객체 생성
val manager = getSystemService(NOTIFICATION_SERVICE) as NotificationManager

// NotificationManagerCompat을 이용해 바로 이용해도 좋다
NotificationManagerCompat.from(context)
Builder
알림을 다양한 정보로 생성
NotificationCompat.Builder를 생성한 후 Builder에 각종 setter 함수를 사용하여 알림의 구성 정보를 명시한 후 Notification을 만들고 NotificationManager로 알림을 발생
if(Build.VERSION.SDK_INT >= Build.VERSION_CODES.O) {
    // Notification Channel 아이디, 이름, 설명, 중요도 설정
    val channelId = "channel_one"

    // 채널 생성 코드...

    // API 26 이상에서는 Builder 생성자에 NotificationChannel의 아이디값을 설정
    notificationBuilder = NotificationCompat.Builder(this, channelId)
} else {
    // 26 미만은 생성자에 context만 설정
    notificationBuilder = NotificationCompat.Builder(this)
}

notificationBuilder.apply {
    setSmallIcon(android.R.drawable.ic_notification_overlay)  // 작은 아이콘 설정
    setWhen(System.currentTimeMillis()) // 시간 설정
    setContentTitle("Content Title")    // 알림 메시지 설정
    setContentText("Content Message")   // 알림 내용 설정
    setDefaults(Notification.DEFAULT_VIBRATE)  // 알림과 동시에 진동 설정(권한 필요)
    setAutoCancel(true)  // 클릭 시 알림이 삭제되도록 설정
    setOngoing(true)     // 알림 제거 막기 (전체 지우기 등)

    // 알림 중요도 26버전 미만을 고려할 때 지정
    //setPriority(NotificationCompat.PRIORITY_DEFAULT)
}
Channel
NotificationChannel : SDK 26 (Android 8)부터 추가된 알림의 관리 단위
앱의 환경설정에서 Notification의 ON/OFF를 설정할 수 있는데, 이때 사용되는 개념이 바로 '채널'이다.
NotificationChannel(id: String!, name: CharSequence!, importance: Int)
생성자로 Channel의 id, name, importance를 설정
Channel에 대해 설명, 소리, 진동, 불빛 등의 옵션을 설정
Manager의 createNotificationChannel 함수를 사용하여 시스템에 NotificationChannel을 설정
if(Build.VERSION.SDK_INT >= Build.VERSION_CODES.O) {
    // Notification Channel 아이디, 이름, 설명, 중요도 설정
    val channelId = "channel_one"
    val channelName = "첫 번째 채널"
    val channelDescription = "첫 번째 채널 설명"
    val importance = NotificationManager.IMPORTANCE_DEFAULT

    // NotificationChannel 객체 생성
    val channel = NotificationChannel(channelId, channelName, importance).apply{
        // 설명 설정
        description = channelDescription

        // 채널에 대한 각종 설정(불빛, 진동, 소리 등)
        enableLights(true)
        lightColor = Color.RED
        enableVibration(true)
        vibrationPattern = longArrayOf(100L, 200L, 300L)

        val uri = RingtoneManager.getDefaultUri(RingtoneManager.TYPE_NOTIFICATION)
        val audio = AudioAttributes.Builder()
                        .setContentType(AudioAttributes.CONTENT_TYPE_SONIFICATION)
                        .setUsage(AudioAttributes.USAGE_ALARM)
                        .build()
        setSound(uri, audio)
    }

    // 시스템에 channel 등록
    manager.createNotificationChannel(channel)

    or

    NotificationManagerCompat.from(this).createNotificationChannel(channel)
}
Importance (중요도)
Notification의 중요도에 따라 알림의 형태가 달라진다.
SDK 26 (Android 8.0) 이상은 Notification Channel에 중요도 importance를 설정하고
SDK 25 (Android 7.1) 이하는 Notification (Builder)에 중요도 priority 설정
버전 지원에 따라 importance 값과 priority 값 모두 가지게 될수 있는데 결과는 importance를 따라간다.
| 중요도 | SDK 26 이상 Channel Importance |
SDK 25 이하 Notification Priority |
| 긴급 알림음이 울리며 헤드업으로 표시 |
IMPORTANCE_HIGH | PRIORITY_HIGH PRIORITY_MAX |
| 높은 알림음이 울림 |
IMPORTANCE_DEFAULT | PRIORITY_DEFAULT |
| 중간 알림음이 울리지 않음 |
IMPORTANCE_LOW | PRIORITY_LOW |
| 낮음 알림음이 없고 상태표시줄에 표시되지 않음 |
IMPORTANCE_MIN | PRIORITY_MIN |
사용 및 취소
Notificiation
NotificationBuilder를 통해 알림 내용을 구성했다면 NotificationManager를 통해 알림을 상태바에 등록
build() 함수를 사용하여 Notification 객체를 생성한 후 NotificationManager의 notify 함수를 통해 알림을 등록한다.
이때, 식별자 값(Int)을 두는데 이 값은 알림을 업데이트하거나 지울 때 사용한다.
// Notification 객체 생성
val notification = notificationBuilder.build()
// Notification 식별자 값, Notification 객체
manager.notify(0, notification)

or

NotificationManagerCompat.from(this).notify(0, notificationBuilder.build())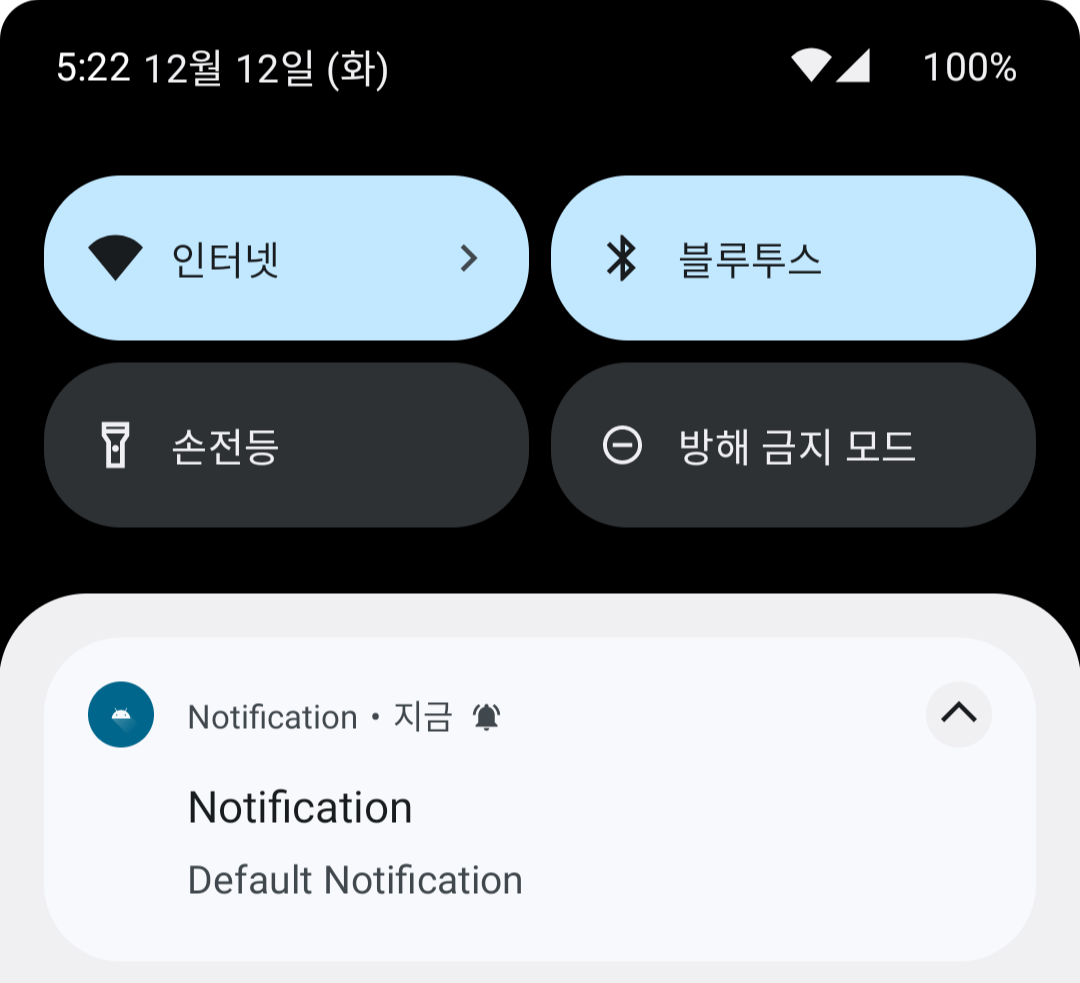
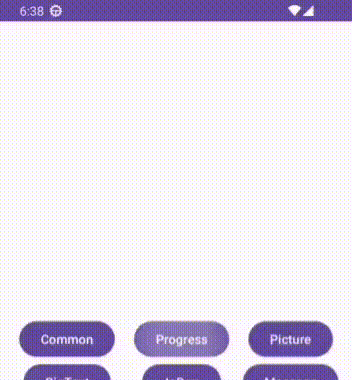
Progress
진행상황을 표시하기 위해서 Progress도 이용할 수 있다.
NotificationBuilder.setProgress(int max, int progress, boolean indeterminate)
아무 생각없이 높은 중요도 채널 ID로 Progress를 했더니 테스트 기기의 사운드 진동 알림이 폭주를 했다.
개발 의도에 따라 다르겠지만 Progress가 완료되었을 때만 소리진동 알림을 해주기 위해 만들어둔 다른 알림 중요도의 채널을 setChannelId()로 Switching을 해주었다.
val notifyId = 0
val notificationBuilder = NotificationCompat
            .Builder(this, CHANNEL_ID_SILENT)	//낮은 importance로 설정해둔 소리 안나는 채널 ID
            .setSmallIcon(R.drawable.ic_launcher_foreground)
            .setWhen(System.currentTimeMillis())
            .setContentTitle("Progress")
            .setContentText("Progress Notification")
            .setProgress(100, 0, false)

lifecycleScope.launch {
    for (i in 1..100) {
        notificationBuilder.setProgress(100, i, false)

        NotificationManagerCompat.from(this).notify(notifyId, notificationBuilder.build())

        delay(100)
    }

    //Progress 완료시 사운드 진동 알림 (채널 switching)
    notificationBuilder.setChannelId(CHANNEL_ID_SOUND_VIBE) //높은 inportance로 설정해둔 소리진동 채널 ID
    NotificationManagerCompat.from(this).notify(notifyId, notificationBuilder.build())
}
Cancel
식별자 값을 이용해 알림을 지운다.
//사용한 Notification 식별자 값
val progressNotify = 0
val pictureNotify = 1

NotificationManagerCompat.from(this).cancel(progressNotify)
NotificationManagerCompat.from(this).cancelAll() //모두 삭제
사용자 Interaction
알림 Touch
대부분은 탭을 하게 되면 알림에 응답하는 앱의 액티비티 화면을 켜는 데 사용하게 된다.
탭 이벤트가 발생하면 앱에서의 화면이 아니라 상태바(시스템 화면)에서 발생하는 것이므로 시스템에 이벤트가 발생하면 어떻게 처리해 달라고 의뢰하는 방식을 사용하여 탭에 응답한다.
이러한 방식을 사용하기 위해서 PendingIntent 객체가 사용되고 이를 setContentIntent()의 인자로 대입한다.
PendingIntent는 알림에서만 사용되지 않으며 인텐트 발생을 누군가에게 의뢰해야 하는 여러 곳에서 사용
//알림 클릭시 띄울 Intent
val intent = Intent(
    this@MainActivity, MainActivity::class.java
).apply { flags = Intent.FLAG_ACTIVITY_CLEAR_TASK or Intent.FLAG_ACTIVITY_NEW_TASK }

//PendingIntent 생성 getActivity, getBroadcast, getService 등등
val pendingIntent = PendingIntent.getActivity(
    this@MainActivity, 0, intent,PendingIntent.FLAG_UPDATE_CURRENT
)

notificationBuilder.apply {
    setSmallIcon(android.R.drawable.ic_notification_overlay)
    setWhen(System.currentTimeMillis())
    ...

    setContentIntent(pendingIntent)
}
Action
Notification에 최대 3개까지의 유저 이벤트를 위한 액션을 추가할 수 있다.
ActionBuild를 만들고 NotificationBuilder의 addAction() 함수로 추가 한다.
Action도 마찬가지로 pendingIntent를 사용
val actionBuild= NotificationCompat
    .Action
    .Builder(R.drawable.ic_launcher_foreground, "확인", pendingIntent)
    .build()

notificationBuilder.apply {
    ...

    addAction(actionBuild)
}
RemoteInput
SDK 24 (Android 7.0)부터는 사용자가 Activity를 열지 않고 Notification에서 바로 텍스트 입력창을 열어 답장이 가능하다.
큰 별개의 기능은 아니고 Action에 RemoteInput.Builder를 추가하면 된다.
1.RemoteInput.Builder를 통해 노티피케이션에 텍스트 입력창을 추가
2. 답장 작업 PendingIntent 생성 (임시 MainActivity 띄우는 pending 사용)
3. RemoteInput과 PendingIntent를 연결하는 Action을 생성
4. 만든 Action을 NotificationBuilder에 addAction을 통해 전달
val keyTextReply = "key_text_reply"
val remoteInput = RemoteInput.Builder(keyTextReply)
    .setLabel("답장을 입력하세요.")
    .build()

val remoteInputAction= NotificationCompat
    .Action
    .Builder(R.drawable.ic_launcher_foreground, "답장", remotePendingIntent) //답장 전송시 수행할 PendingIntent
    .addRemoteInput(remoteInput)
    .build()

notificationBuilder.apply {
    ...

    addAction(remoteInputAction)
}
Notification Style
NotificationBuilder의 setStyle()을 통해 여러 가지 모양의 Notification을 만들 수 있고 적용되는 스타일은 크게 확장형과 커스텀으로 나눌 수 있다.
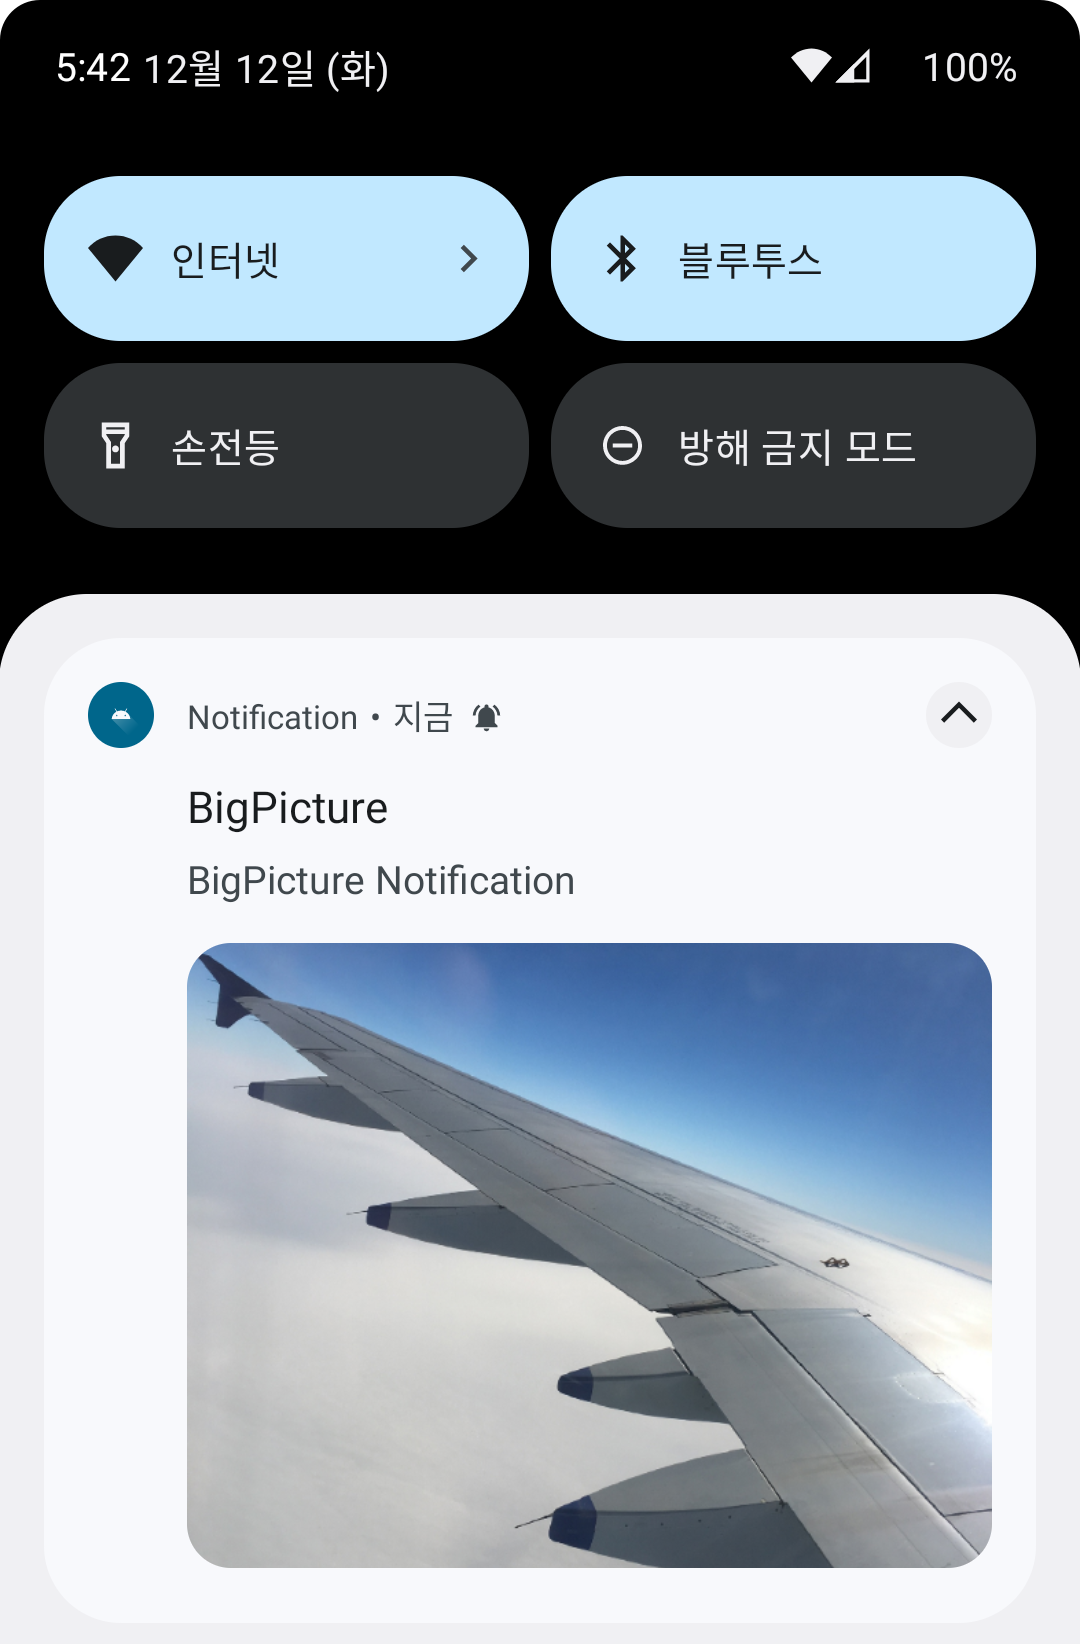
BigPicture
Notification의 확장된 영역에 Image를 추가
공식 문서는 사진 1mb 이하 사용 권장 (고용량 실험 결과 : MainThread 부하, 성능 저하, 에뮬은 SystemUI isn't responding)
BigPictureStyle().bigPicture(image)
val picture = BitmapFactory.decodeResource(this.resources, R.drawable.ex_pic)
val style = NotificationCompat.BigPictureStyle().bigPicture(picture)

notificationBuilder.apply {
    ...
    setStyle(style)
}
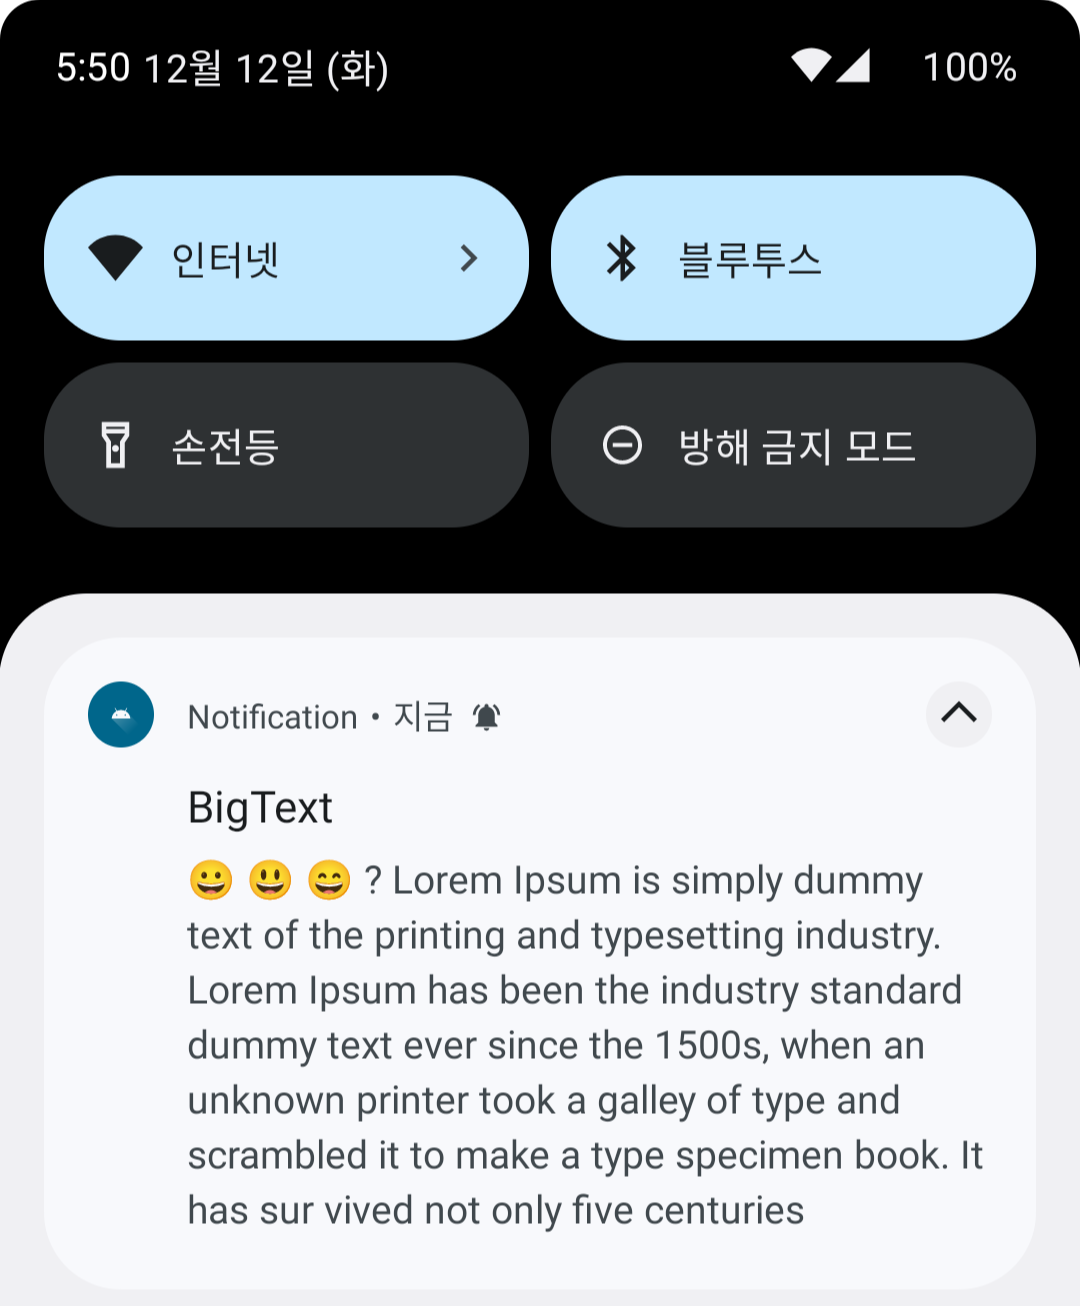
BigText
Notification의 확장된 영역에 Text를 추가
BigTextStyle().bigText(text)
val style = NotificationCompat.BigTextStyle().bigText(getString(R.string.lorem_ipsum))

notificationBuilder.apply {
    ...
    setStyle(style)
}
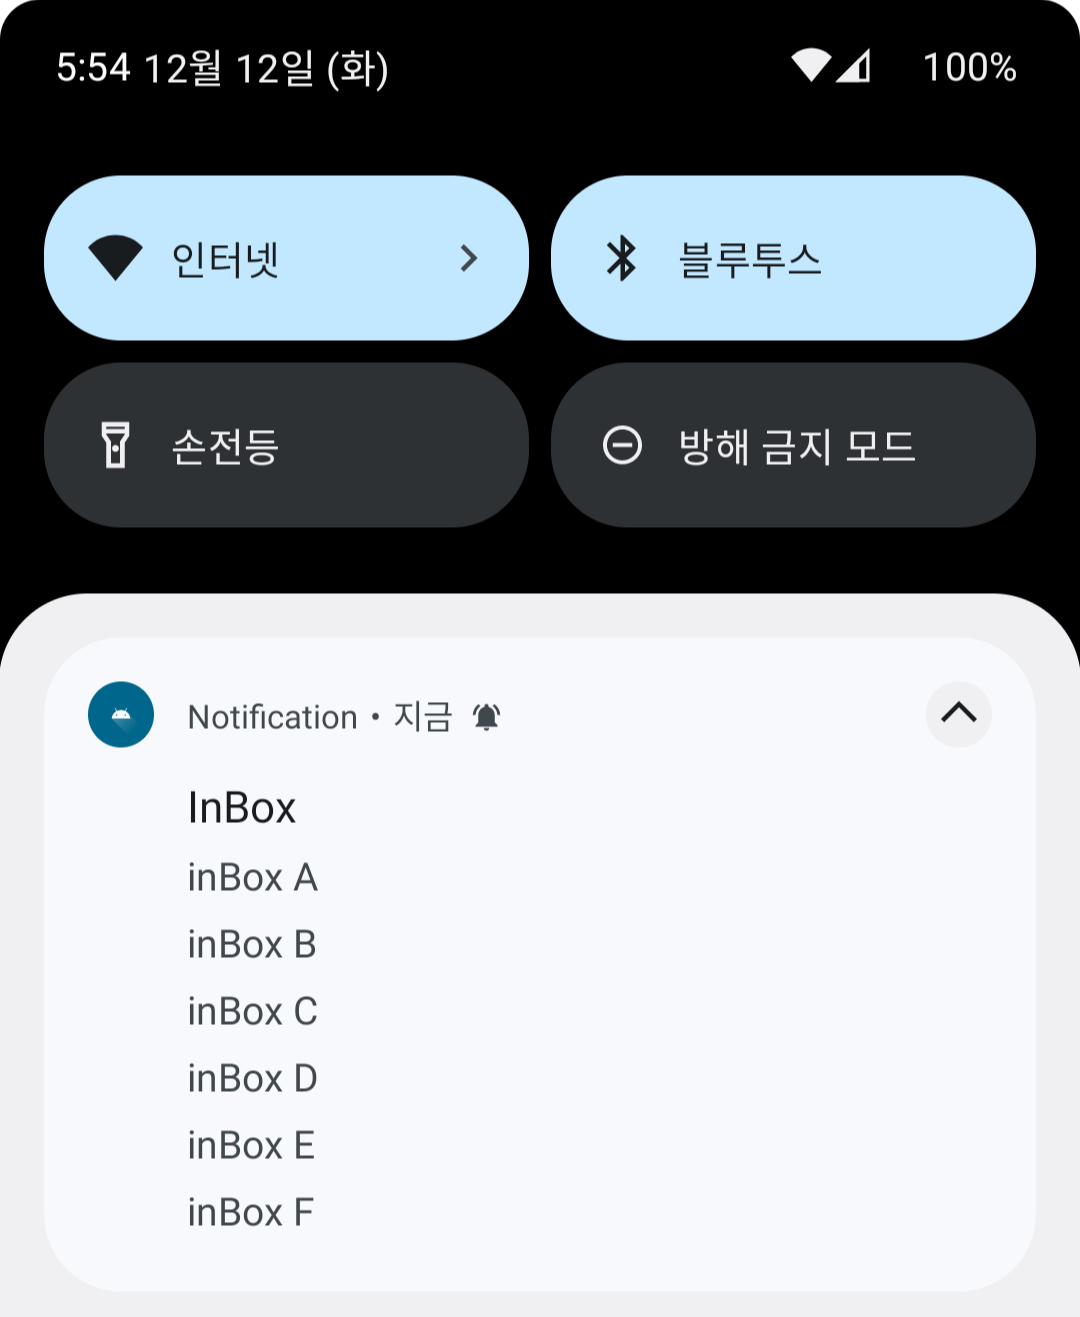
InBox
BigTextStyle()과 다르게 짧은 텍스트 여러 줄이 확장된 영역에 최대 6개 표시
InBoxStyle().addLine(text)
val style = NotificationCompat.InboxStyle()
                .addLine("inBox A")
                .addLine("inBox B")
                .addLine("inBox C")
                .addLine("inBox D")
                .addLine("inBox E")
                .addLine("inBox F")

notificationBuilder.apply {
    ...
    setStyle(style)
}
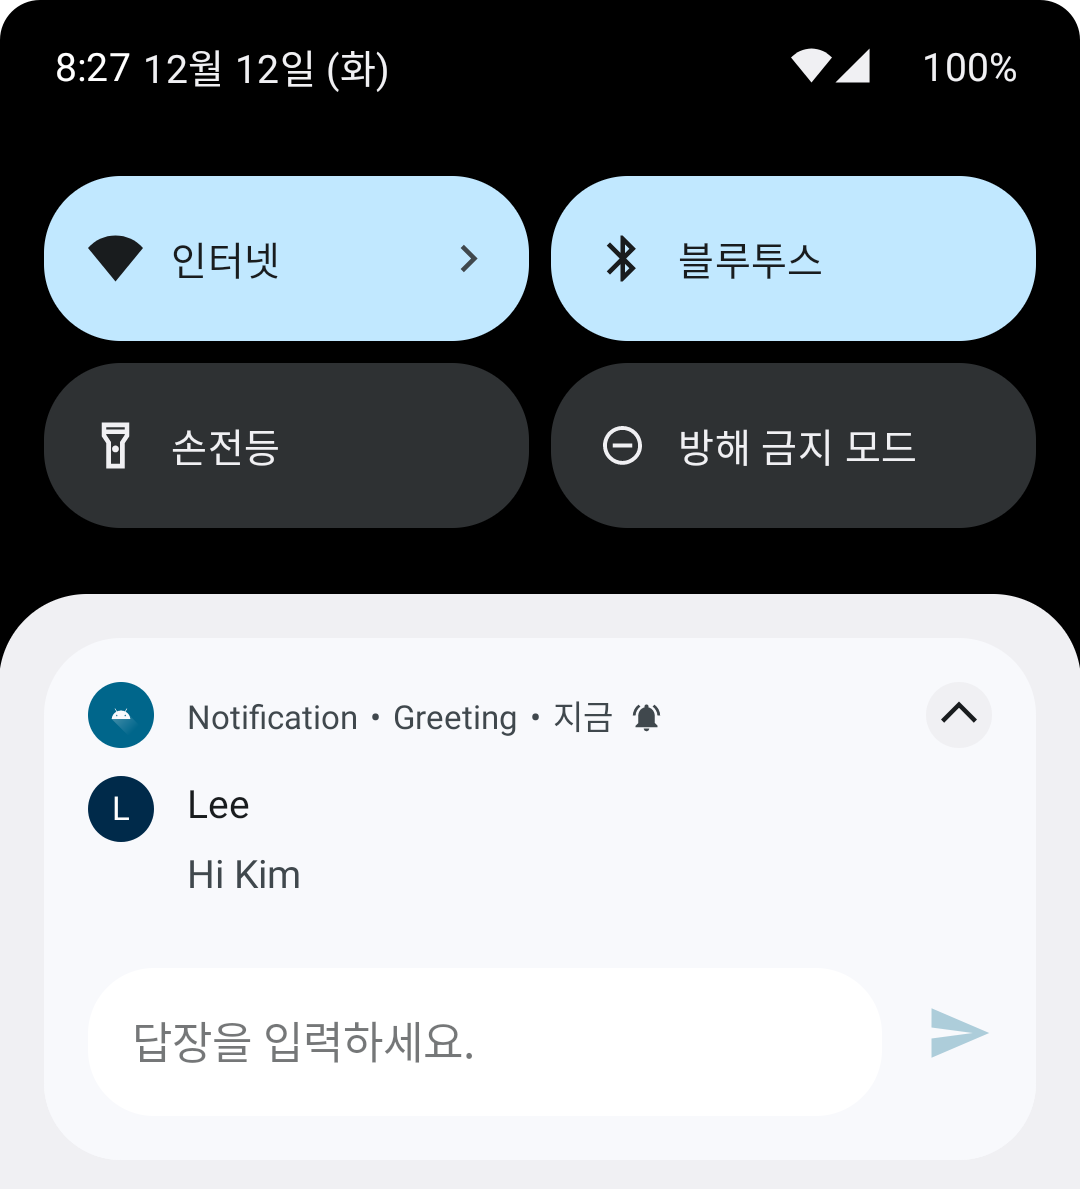
Messaging
여러 사람 사이의 순차 메시지를 표시
MessagingStyle.addMessage(message)
메시지는 NotificationCompat.MessagingStyle.Message를 통해 텍스트, 시간, 보낸 사람을 표시하는 메시지 객체를 만들 수 있다.
선택적으로 setConversationTitle()을 사용해 대화 위에 표시되는 제목을 추가 가능
이 스타일은 SDK 24 (Android 7.0) 이상을 지원하는 기기에만 적용, 그 이하 버전에서는 NotificationCompat(호환성 라이브러리)를 통해 일반 확장형 Notification이 보인다.
import androidx.core.app.Person

val person1 = Person.Builder().setName("Lee").build()
val person2 = Person.Builder().setName("Kim").build()

val msg1 = NotificationCompat
    .MessagingStyle
    .Message("Hi Kim", System.currentTimeMillis(), person1)

val msg2 = NotificationCompat
    .MessagingStyle
    .Message("Oh Hi", System.currentTimeMillis(), person2)

val style = NotificationCompat
    .MessagingStyle(person1)
    .setConversationTitle("Greeting")
    .addMessage(msg1)
    .addMessage(msg2)

notificationBuilder.apply {
    ...
    setStyle(style)
}
CustomView
CustomView를 설정해 사용할 수 있지만 협소한 공간에 알림을 띄우는 것이기 때문에 복잡한 레이아웃 같은 Notification은 사용하기 힘들 수 있다.
NotificationCompat.DecoratedCustomViewStyle
RemoteViews는 다른 프로세스에 표시할 수 있는 뷰를 나타낸다.
Layout Resource 파일을 통해서 뷰의 계층 구조가 만들어진다.
하지만 RemoteView에 사용되는 View들은 한정적이다.
https://developer.android.com/reference/android/widget/RemoteViews
notificationBuilder.apply {
    ...
    .setStyle(NotificationCompat.DecoratedCustomViewStyle())
    .setCustomContentView(
        RemoteViews(packageName, R.layout.custom_notiview).apply {
            setTextViewText(R.id.txt_1, "커스텀 뷰")
            setTextViewText(R.id.txt_2, "테스트")
        }
    )
}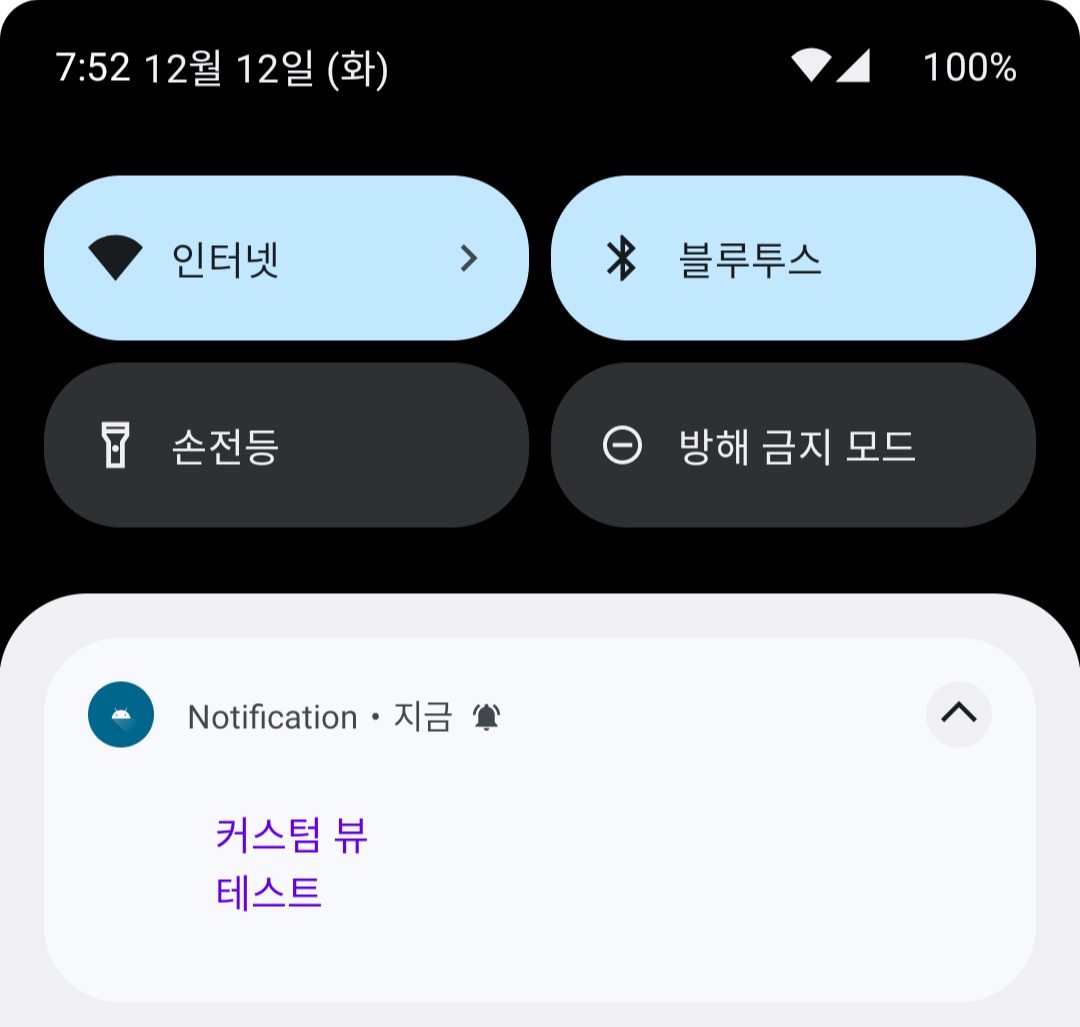
디자인 자신 없다면 건들면 안 되겠다.
알림 중요도 관련사항
설정한 importance / priority 값이 항상 알림의 동작을 결정한다고 보장할 수 없다.
importance / priority 값이 알림의 동작을 결정하는 것은 맞으나 다양한 상황에서 해당 값이 바뀔 수 있으므로 항상 설정해 준 값대로 알림이 동작할 것이라고 판단하지 말라고 한다.
실제로 importance 값을 High로 세팅한 Channel 이어도 해당 Channel 설정에서 importance 값을 변경할 경우 high 가 아닌 가장 최근에 변경한 값으로 적용됨을 확인할 수 있다.
(유저가 변경한 설정이 유지되는 게 자연스러운 로직이라고 한다.)
버전별 권한 관련
- 타겟 sdk 32 이하의 앱이 Android 13 디바이스 설치 시 Notification Channel을 등록할 때 자동으로 Notification 권한 요청 팝업이 나옴
- 32 이상 앱이 Android 13 디바이스 설치시 Notification 권한요청을 개발자가 원하는 타이밍에 노출 가능
- 32 이상 앱이 Android 12 이하 디바이스에 설치시 기존과 동일하게 Notification 권한 요청 없이 사용 가능
- 32 앱을 33으로 업데이트 시 기존 알림 권한 동의 상태라면 업데이트 이후 기본으로 허용이지만 예외 있음
- 기기에 따라 자동으로 허용되지 않고 다시 한번 권한을 얻어야 하는 경우가 있음
- 때문에 Notification 권한이 허가되어 있는지 한 번 확인하는 작업을 넣기를 권장
권한 팝업 관련사항
- sdk 32 이하 앱의 경우, 시스템이 자동으로 권한 팝업을 띄웠을 때, 사용자가 거부 버튼을 한번 누르면, 앱이 재시작해도 팝업이 발생하지 않는다.
- 33 이상 앱의 경우, 앱이 권한 팝업을 띄웠을 때, 사용자가 거부 버튼을 두 번 누르기 전까지 퍼미션 팝업을 계속 띄울 수 있다.
- 사용자가 거부 버튼을 눌러서 더 이상 팝업을 띄울 수 없다면 사용자가 직접 앱 설정에 들어가서 권한을 허가해줘야 한다.
const val DENIED = "denied"
const val EXPLAINED = "explained"

// 권한 요청용 Activity Callback 객체
private val registerForActivityResult =
    registerForActivityResult(ActivityResultContracts.RequestMultiplePermissions()) { permissions ->
        val deniedPermissionList = permissions.filter { !it.value }.map { it.key }
        when {
            deniedPermissionList.isNotEmpty() -> {
                val map = deniedPermissionList.groupBy { permission ->
                    if (shouldShowRequestPermissionRationale(permission)) DENIED else EXPLAINED
                }
                // 단순히 권한이 거부 되었을 때
                map[DENIED]?.let {

                }
                map[EXPLAINED]?.let {
                    // 권한 요청이 완전히 막혔을 때(주로 앱 상세 창 열기)
                }
            }

            else -> { // 모든 권한 허가

            }
        }
   }
구현 코드
https://github.com/wo9374/StudyProject/tree/main/Notification
Permission
https://android-developer.tistory.com/entry/안드로이드13에서-Notification-허가-받기-방법-및-변경점
https://salmonpack.tistory.com/32
중요도
https://rkdxowhd98.tistory.com/188
https://vagabond95.me/posts/notification-with-oreo/
Style
https://hyejineee.github.io/blog/android-notification-implement
'Android > Reference' 카테고리의 다른 글
| Service (0) | 2023.12.14 |
|---|---|
| AlarmManager (0) | 2023.12.12 |
| DataStore / Preference, Proto (0) | 2023.12.04 |
| BottomSheet (Persistent, Modal) (0) | 2022.05.02 |
| RecyclerView Item에 Animation 주기 (0) | 2022.04.18 |